Live2D Cubism is a popular animation software among virtual YouTubers and game developers. It allows for the creation of dynamic expressions and anime-style animations, simply by applying deformations to 2D illustrations.
GameSynth 2022 now supports the import of Live2D animation curves, in order to design sounds that perfectly match these animations.
Importing Animation Curves
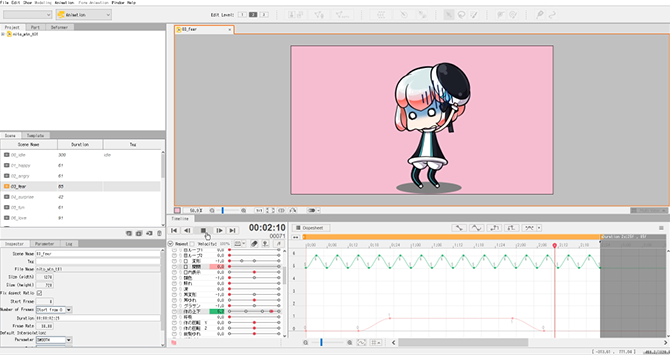
Live2D’s animation curves can be exported via the File->Export for runtime-> Export motion file command. They are stored in motion3.json files that can be found in the runtime>motions subfolder of a Live2D project.
To convert them to Automation Curves usable in GameSynth, click on the Automation Curves menu, select Import curve, and choose a motion3.json file. Then, select a curve in the window that lists all the parts of your character (Eyes, Arms, Mouth, Legs, etc..). It is possible to visualize the curve and process it (Normalization, Clipping, Thinning) before importing it. Note that the Duration is also retrieved from the motion file.
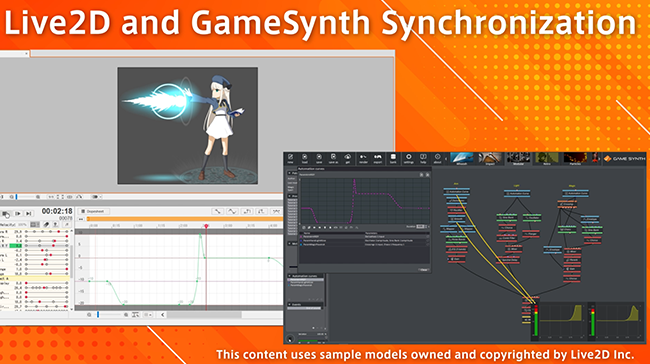
In this example, the Nito sample character provided by Live2D was used. As shown above, the animation in Live2D matches exactly the automation in GameSynth.
Let’s see how to use these curves to design anime-like sound effects for this cute character.
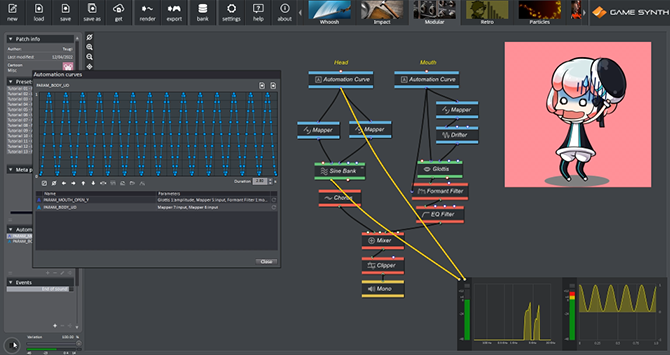
Two curves were imported, one for character’s mouth opening, and the other for the body’s quick back and forth.
The Body curve already looks like an LFO, which is great to control both the Amplitude and Pitch of a Sine Bank and create a feeling of dizziness. A Mapper between the Automation Curve and the Sine Bank controls the range of each parameter. An additional Chorus module emphasizes the effect by adding even more modulation.
Another branch of the patch uses the Mouth Automation. This time, the curve is simpler, only consisting of the mouth opening, holding, and closing. It will be used to control the amplitude of a Glottis module, ideal to create vocalization. The Pitch is also controlled, after reducing its range with a Mapper and creating random modulations to simulate the hoarseness of the voice with a Drifter module. Finally, a Formant Filter softens the signal to produce a more natural sound.
Let’s increase the complexity a bit: using a different animation for the same character, four curves are imported, for the Eye, Mouth, Arm and Body.
The Eye and Mouth curves are used in the same way, although we adjust the Mapper parameters to provide a different pitch range, to convey a different emotion. As for the Eye, a Derivative module to gets the Velocity of the curve and triggers the sound only when the Eyes are closing then opening.
The same technique is used for the Arms curve, where a Derivative module controls the Amplitude and Pitch of a Noise Bands module to generate cloth Foley corresponding to the arms movement.
Finally, the straight curve of the Body controls both the Amplitude and Pitch of another Sine Bank module, creating a sweep sound that matches the jumping movement of the character.
Going further
Importing an animation curve in a sound tool offers many benefits. Not only it’s possible to synchronize the sound perfectly with the animation, but should the duration or movement change during production, a new sound can be generated instantly, simply by reimporting the new curve. This is especially useful in highly iterative production environments such as game development. It eliminates the need to source new sounds or to process existing ones.
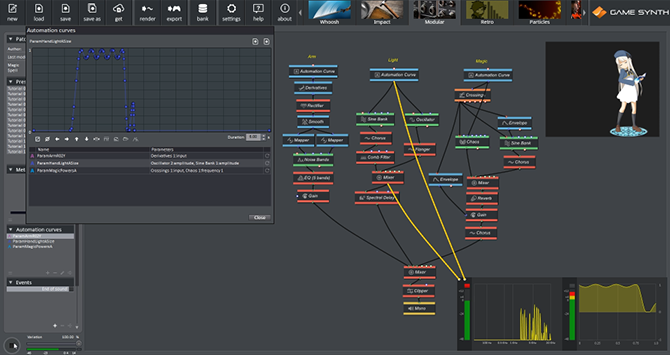
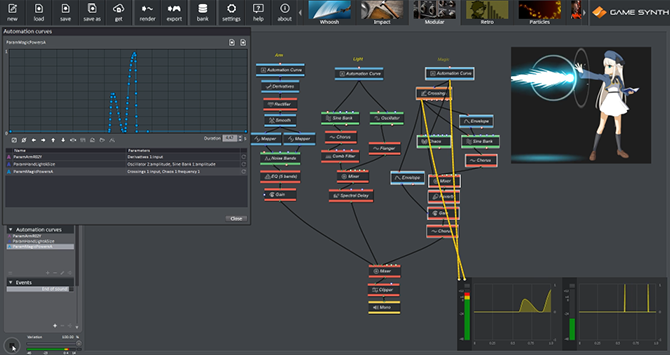
To demonstrate this, let’s design sounds for the Rice Glassfield sample character, also provided by Live2D, which is a bit more game-oriented.
The right arm, hand light, and magic power curves will be used. For the first two, the patching is similar to the previous examples. Cloth movements sound are based on a Noise Bands module for the right arm, and shimmery, high-pitched sounds are generated for the hand light using Sine Bank and Oscillator modules.
In the case of the Magic Power, the goal is to trigger a sound synchronized with the graphic effect on screen. To achieve this, a Crossings module is used. It will activate its output when its input reaches a specific value while the curve is increasing, decreasing, or in both cases. Since the curve has an impulse shape, a value of 0.03 when the curves increases will work well here. The Trigger mode is set to Always, in case the magical power is triggered more than once (as we will see below). Sound-wise, a Chaos module generates the noisy part of the sound, while a Sine Bank module synthesizes the shimmery part.
During production, an animation might be updated, for example here to go faster, or use the Magic Power twice. Once the edits made in Live2D, the only task is to re-import the animation curves from the Automation window in GameSynth. In this example, the duration will be automatically adjusted, as well as the curves. Pressing Play in GameSynth will generate a new sound, matching perfectly the updated animation, without having to edit the patch!
You can download the GameSynth patches used in this tutorial below, and the sample characters on Live2D download page to try yourself!
Please make sure you have the very latest GameSynth update, as the Live2D importer in GameSynth 2022.1 has recently been improved.
Copyright Disclaimer: this content uses sample models owned and copyrighted by Live2D Inc. The sample models are utilized in accordance with terms and conditions set by Live2D Inc. This content itself is created at the author’s sole discretion.


