In this new series, we will examine in detail how some GameSynth patches are built. This is a practical way to discover the features of GameSynth and to learn some patching tricks at the same time!
In our first post, we will see how we designed a creepy music ambience using a surprisingly low number of modules. First, let’s check the video of the patch in action!
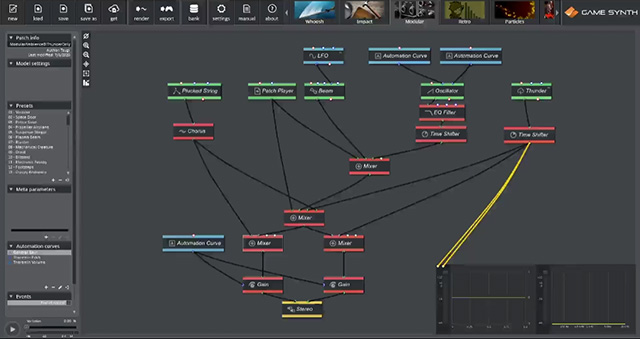
When we think about GameSynth, we envisage ourselves crafting sound effects, but it is also possible to design more musical patches. There are five elements in our patch: an introductory sound, a pulsating bass, pads, a theremin-like melody, and a couple of thunderclaps guaranteed to make the ambience even creepier! It is straightforward to locate them as each element corresponds to a green generator module.
The pads
The patch was started by creating the pads, so let’s retrace our steps. These pads were actually done in the Particles model, based on the Ethereal preset. Build around a single choir sample, this preset generates a rich, pleasant sound, well adapted for a pad. It already has a pitch scale assigned to it, so slowly drawing a line downwards allowed us to easily create a 3-chord pad sequence.
We saved the patch and then added it to the Modular model via a Patch Player module. Using the Patch Player to import patches from other models is a great way to quickly build complex parts in the Modular.
The bass
Next, the pulsating bass sound was added on top of the pads. It is generated by a Beam oscillator, one of the new modules introduced in GameSynth 220.1. The Beam module can generate many harmonics. Here, its pitch is set very low and its ‘width’ input is slowly modulated by a sine LFO to create the pulsating bass sound.
The introductory sound
At the very beginning of the patch, a heavily modulated sound, with a bright attack and a long release is played. This sound is typical of the Karplus-Strong algorithm behind the Plucked String module. A very low decay value ensures that it will keep playing until we enter the second pad chord. The heavy modulation comes from the Chorus module inserted after the generator and makes it just creepy enough!
The melody
Adding the melody was the step that took the most time. There are several ways to do this. For instance, we could have used a Sequencer module. But since we wanted to add some pitch slides, we decided to create the melody directly by drawing it. Indeed, two Automation Curve modules control the amplitude and the pitch of a saw Oscillator. The output of the oscillator is then sent through an EQ Filter to smooth it a bit and make it more theremin-like. In the first video, you can hear the result and see the corresponding waveform on the oscilloscope.
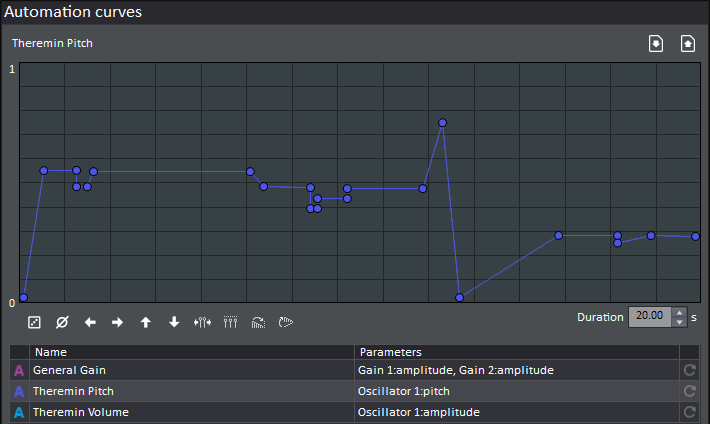
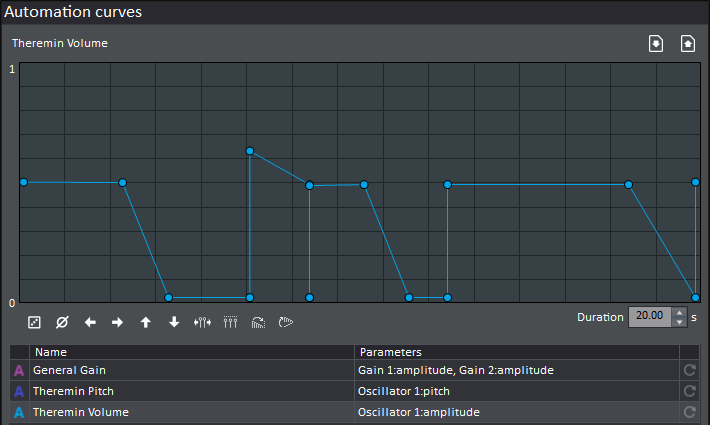
Because we simply drew the pad sequence in the Particles model without any reference, the timing of the chords was not really tight. Having the possibility to draw the melody and to adjust it precisely to match the timing of the pads was definitely helpful.
The Time Shifter module is just here for convenience, so that we can start drawing the melody when the sound actually starts. Instead, we could just have drawn a silent segment at the beginning of the automation curves.
The thunder
The thunder – a stalwart of creepy ambiences – has been added last. A Time Shifter module allows us to trigger it exactly when we need. Luckily, with the default settings of the Thunder module, the second thunderclap occurs at a very good time in our ambience, so we simply left it like that. Otherwise, we could have triggered it precisely with an extra Sequencer or Clock module.
The mix
At the bottom of the patch, the structure with 3 Mixer modules represents a typical way to create stereo mixes in the Modular model. The central mixer sums the signals that will be sent to both channels, while the left and right mixers get audio from the central mixer and from any signals that must be played on a single channel.
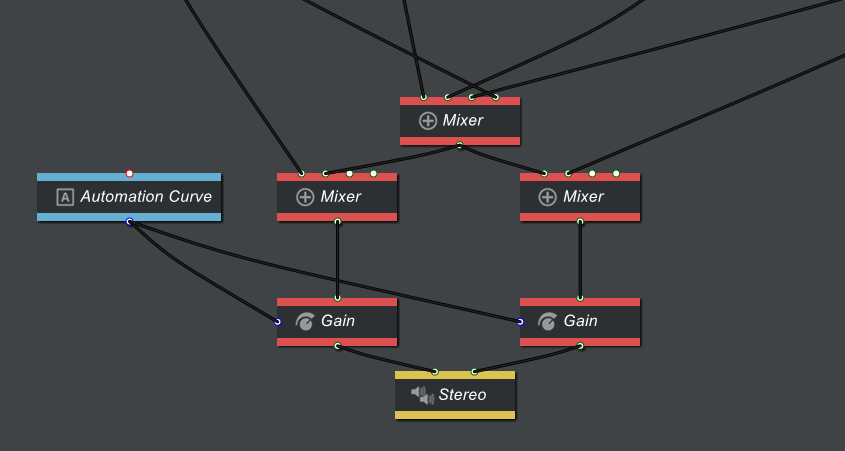
Additional Gain modules have been added to each channel. Driven by an automation curve, they are used to control the overall volume of the patch. In this case, their only purpose is to add a short fade-out at the end.
That’s it! We hope that this first post in the series gave you some ideas to build your own patches. Check our blog for new episodes of Patch Anatomy coming soon!


