


Introduction
GameSynth’s Modular model offers a great visual patching system for creating sound procedurally. Part of this package includes signal generators such as the Creature and Motor modules, which are a great starting point for more complex ideas. Since these modules are blank canvases, we need to exert some control to get the desired effect. Fortunately, GameSynth also gives you a few different ways to do this! Moreover, not only can you use the purpose-built Control Signal modules, but you can also use audio signals as control signals. This month’s blog will show off a few of these control methods and how you can visualize them.
Setup
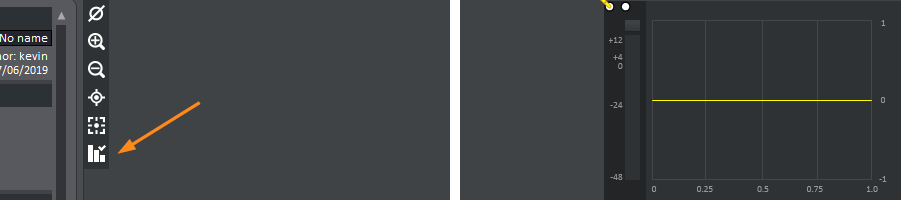
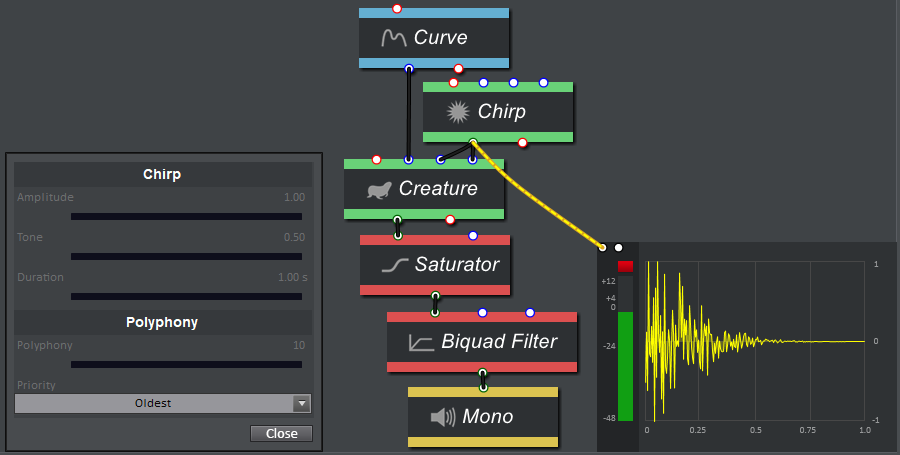
To better understand what the modules are doing; it can be helpful to visualise our signals. We can do this using the Analyzer, which appears in the bottom right of the main window once we activate it via the icon of the three descending bars on the top left. We can then drag any signals into the left and right inlets at the top of the Analyzer, and further change between waveform and spectral views by clicking on the display. A module must be part of a patch which leads to an Output, or else it won’t send any signal to the Analyzer. This omission is an optimization feature of GameSynth which halts processing any module which is not functionally relevant to the patch.
Of course, we also need to hear what we’re dealing with, and the Creature module offers us a great way to facilitate this. I have routed the signal through a Saturator to taste, but you can use whatever signal processing sounds best to you. I have also used a Biquad Filter to remove any unwanted low-frequency rumble.

Envelope
The simplest way to control an audio signal is with an Envelope. Envelopes are functionally the same as Automation Curves, and so I won’t cover the latter in any extra detail. If we double-click on the Envelope module, we have access to a window that allows us to custom-define points, or we can right-click on the display to get a list of pre-defined shapes.
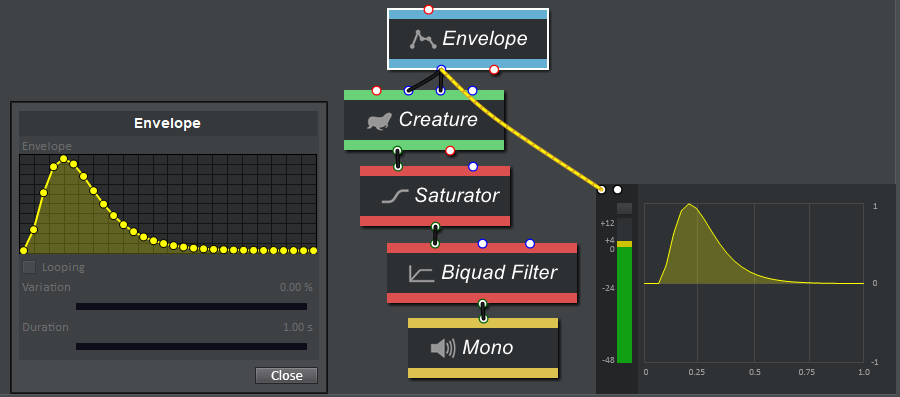
When we play the sound, we can see that the envelope is identical to the waveform displayed on the Analyzer. To understand how the Variation parameter changes this shape, we can dial in 10% to get a small amount of randomization.

As we can see, Variation (in this case) represents a percentage of deviation from each point and not just macro amplitude scaling. Being able to visualize control signals helps in making these sorts of observations easier.
Curve
Curves are used to extract envelopes from pre-existing audio, which allows us to create natural sounding envelopes easily. To do this, we can drop our wave file directly onto the Curve module, and then click the display to access settings where we change the Curve Type to Amplitude (you can also extract Pitch and Noise envelopes!). I am using a short sample of a pony whinnying as my source.
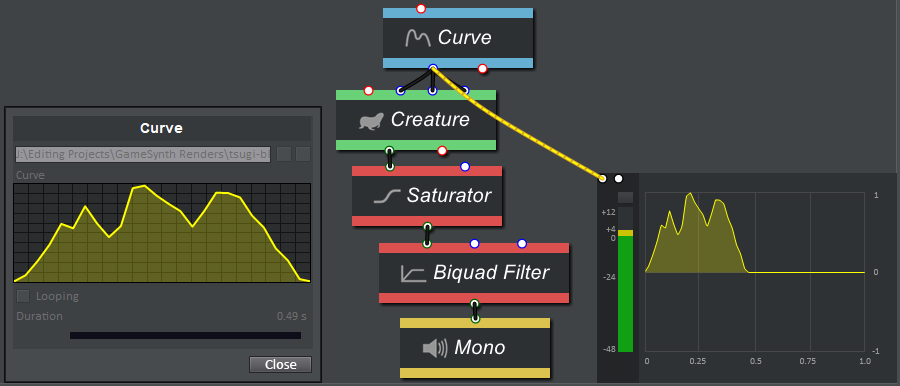
Again, the waveform displayed in the Curve module shows up the same in the Analyzer. Since the sound source is a much deeper sound, we can use the Scale Offset module to pitch the sound down.
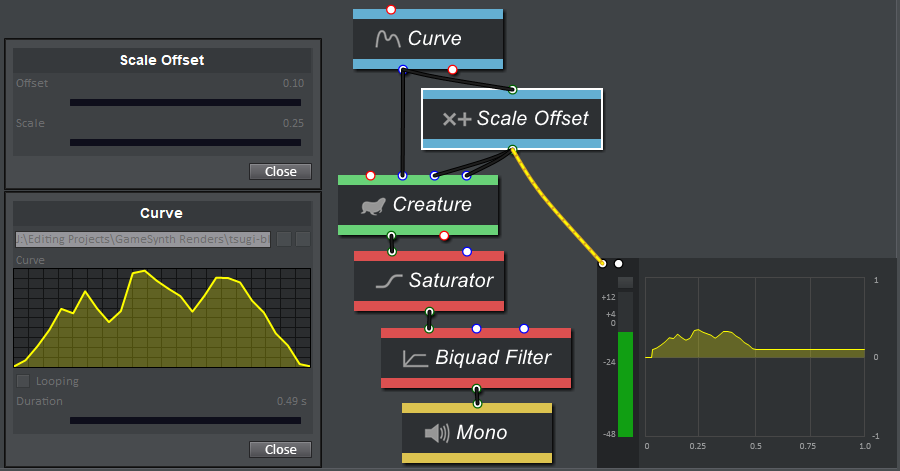
Setting the Scale to 0.25 scales the waveform to a quarter of its original size, which means that the waveform is less dynamic. So that the waveform isn’t too bassy, we can push the waveform back up by setting the Offset to 0.10, raising the overall waveform by one-tenth (so that the lowest point of the waveform after playback will be 0.10). We can also scale by negative values to invert the phase.
LFO
LFOs offer a continuous waveform which can be great for controlling the pitch and modulation of other modules. We can also randomize the waveform Shape at playback by ticking the boxes next to the corresponding shapes. This feature can generate a great selection of vocal utterances, which is especially handy for run-time implementation.
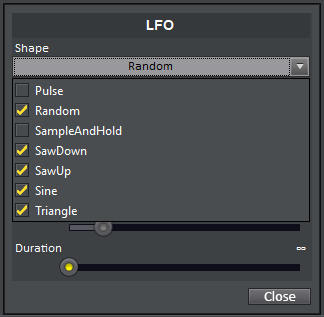
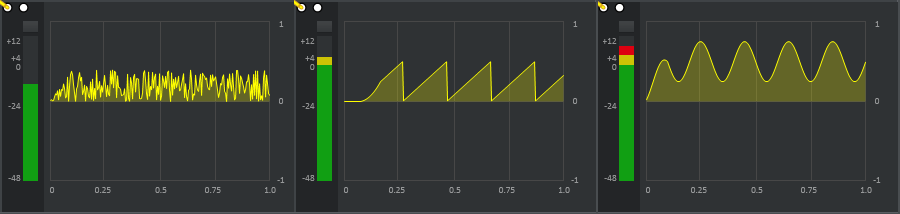
To generate my samples, I set the Attack of the LFO to 0.1. It’s interesting to note the effect that this has on the different waveform shapes. The Sine’s first peak is slightly lower, but the SawUp has a nonlinear ramp up.
Audio Signals
We can determine what kind of signal we are dealing with by looking at the color of the connector circle. Red is for binary operations like triggers, Blue is for control signals, and Green is for audio signals. Despite this distinct separation, we can use different signal types interchangeably. For example, we can use an Audio Generation module such as Chirp to control the Pitch of our Creature module. Using audio signals in this way can produce more chaotic results.
Conclusion
I hope that this has helped to make better sense of the different signals available in the Modular model, as well as of the Analyzer, which is an essential tool for understanding these signals and diagnosing audio problems. If you are stuck for ideas, try wiring patches in weird configurations to see what sorts of crazy sounds you can create.
Article written by Kevin Doran.